
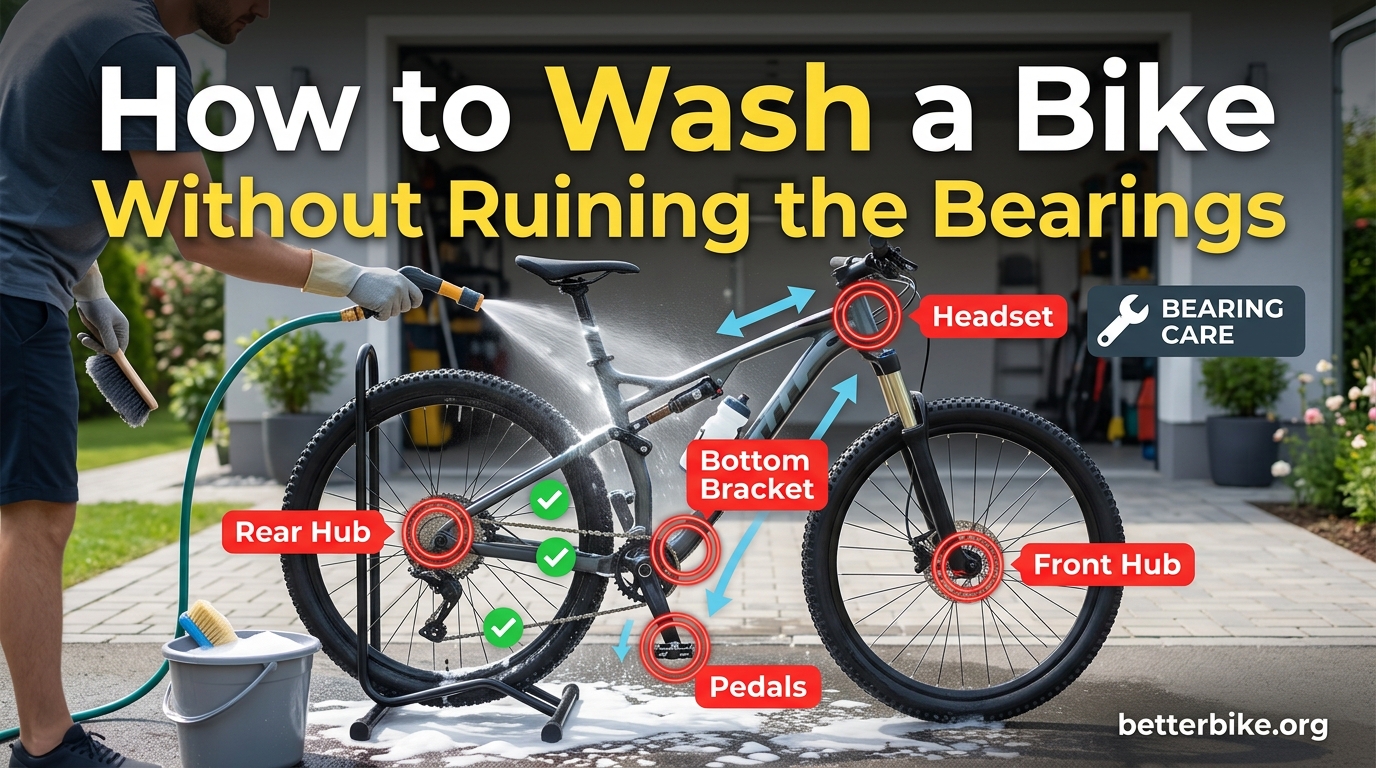
I’ve ruined bearings on three bikes over the years. One from a pressure washer I thought I was being careful with, another from leaving the bike wet in the garage for a week, and a third from spraying degreaser straight at the headset because I assumed seals were magic. Each repair cost me between $80 and $220 in parts and labor. None of them had to happen.
Here’s the honest truth about how to wash a bike without ruining the bearings: most riders overdo it. They use too much water, too much pressure, and too much soap, then leave the bike to dry on its own. Bearings die a slow death from contamination, not from a single wash. The goal is to keep water and degreaser away from sealed bearing systems, dry the bike fast, and relube the moving parts that actually need it.
This guide walks you through the bucket method, the marine grease packing technique, and the drying and lubrication habits that keep your hubs, headset, and bottom bracket rolling smoothly for years. I’ll cover what works, what’s risky, and the warning signs that tell you damage has already started.
Table of Contents
Why Bike Bearings Get Damaged During Washing
Modern bikes use sealed cartridge bearings in the hubs, headset, bottom bracket, and suspension pivots. These bearings have rubber or metal shields that keep grease in and contaminants out. The problem is that seals are not perfect barriers. High-pressure water can force its way past them, carrying dirt and moisture into the bearing race.
Once water gets inside, it displaces the grease. That leaves bare metal-on-metal contact between the balls and races. Add a little road grit and you get pitting, which is the early stage of bearing failure. Pitting feels like roughness or gritty texture when you spin the wheel or turn the bars with no load.
The most vulnerable bearing locations on a bike are:
- Front and rear hub bearings
- Headset bearings (where the fork meets the frame)
- Bottom bracket bearings (inside the frame’s bottom bracket shell)
- Suspension pivot bearings (on full-suspension mountain bikes)
- Freehub body bearings (inside the rear hub)
A garden hose at normal pressure won’t typically push water past a healthy seal. A pressure washer running at 1,500 PSI or more absolutely can, especially on older bearings where the seals have started to harden. The REI expert advice guide on bike cleaning makes the same point: high-pressure spray risks forcing water into sensitive bearing systems throughout the bike.
Heat and detergent make things worse. Hot water softens rubber seals. Strong degreaser strips the factory grease out of any bearing it touches. If you spray Simple Green at your bottom bracket shell, expect that bottom bracket to develop play within a few months.
Supplies You Need for Safe Bike Washing
You don’t need much to wash a bike the right way. I keep my kit in a plastic tub under the workbench, and the whole thing costs less than a shop wash. Here’s what I use every time.
- Two buckets (one for soapy water, one for clean rinse water)
- Mild biodegradable bike wash or diluted dish soap (about 1 tablespoon per gallon)
- A garden hose with a gentle shower or rain-style nozzle
- Soft-bristle brushes in two or three sizes (including a soft toothbrush for tight spots)
- A dedicated chain scrubber or stiff bristle brush for the drivetrain
- Citrus-based or biodegradable degreaser (used on the chain only, not the frame)
- Clean microfiber towels or chamois
- Chain lubricant appropriate for your conditions (wet or dry lube)
- Optional: a bike stand to elevate the bike and let the wheels spin freely
Skip the pressure washer. Skip the dish sponge from the kitchen sink. Skip the harsh degreaser on anything except the chain. And please skip the car wash. Coin-operated car washes spray water at volumes and pressures designed for steel panels, not sealed bearings.
How to Wash a Bike Without Ruining the Bearings: Step-by-Step
This is the process I use on my own bikes and the one I teach to new riders in the shop. It works for road, mountain, gravel, and commuter bikes. The whole wash takes about 25 to 35 minutes from setup to lube.
Step 1: Set Up and Degrease the Drivetrain First
Mount the bike on a stand or flip it upside down on a soft surface. Shift to the smallest cog so the chain is on the least-accessible part of the cassette. Apply degreaser to the chain, cassette, and chainrings while the drivetrain is dry. Let it soak for 2 to 3 minutes.
Scrub the chain with a chain scrubber or stiff brush. Work the brush back and forth across the cassette, getting between each cog. Wipe everything down with a rag before you introduce any water. This step removes 80% of the grime that would otherwise spread across the frame once water hits.
Step 2: Rinse the Frame With Low Pressure
Hook up the garden hose and switch to the rain or shower setting. Hold the nozzle at least 12 inches from the bike. Start at the top of the frame and work down. The goal here is to knock off loose dirt, not blast embedded grime off.
Never aim the hose directly at the headset, bottom bracket shell, hub ends, or suspension pivots. Aim the stream at the down tube, top tube, and chainstays so water flows away from the bearings rather than toward them. Think of it as gentle persuasion, not pressure cleaning.
Step 3: Wash With the Bucket Method
Dip a soft brush in the soapy water and start scrubbing from the top of the bike down. Work in sections: cockpit and frame, fork, wheels, then drivetrain last. The microfiber towel or sponge works well for painted surfaces. The toothbrush gets into brake calipers, derailleur pulleys, and the nooks between the chainstay and seat tube.
For muddy mountain bikes, let the soapy water sit on heavy mud patches for a minute before scrubbing. Don’t dig into the dirt with a sharp tool. The grit in dried mud acts like sandpaper under your brush and can scratch the frame finish. Soft patience works better than elbow grease.
Step 4: Final Low-Pressure Rinse
With the hose still on the rain setting, rinse the soap off the bike. Work top to bottom again. Avoid spraying the bearings directly. Let the water sheet off the frame naturally. If you see water pooling at the bottom bracket shell or inside the headset area, tip the bike to drain it rather than blasting it out.
Step 5: Dry Immediately
Grab a clean microfiber towel and start drying the bike within seconds of finishing the rinse. Bearings hate sitting in water. Wipe the frame, fork, wheels, and the areas around each bearing location. Pay special attention to the underside of the down tube and the bottom bracket shell where water collects.
If you have compressed air, use it sparingly. A short burst at low pressure helps push water out of tight spots. Don’t hold the nozzle right at the bearing seal. A few inches away at less than 50 PSI is plenty. More pressure than that risks forcing water that was sitting harmlessly on the surface straight through the seal.
Step 6: Lube the Chain and Pivot Points
Once the chain is dry, apply fresh lube to the chain while slowly backpedaling. One drop per roller, then wipe off the excess with a clean rag. Too much lube attracts dirt, which is what got you into this wash in the first place. Re-lube any suspension pivots, derailleur pivots, and brake pivots your manufacturer recommends.
Marine Grease Packing and Other Bearing Protection Techniques
After a few years in the industry, I started packing bearings with marine-grade grease as a protective measure. This technique comes from the boating world, where bearings live in constant saltwater spray. The grease is thicker and more water-resistant than standard bike grease.
For bikes, you apply a thin layer of marine grease to the exposed edges of the bearing seals before washing. It acts as an additional barrier. Water and soap hit the grease layer instead of working directly on the rubber seal. After the wash, you wipe the excess off.
This works especially well on bikes that get washed often. Cyclocross racers, commuters in rainy climates, and mountain bikers who ride through mud several times a week all benefit. The cost is a small tin of marine grease (about $8) and an extra minute before each wash.
Other Protection Methods Worth Knowing
Some riders cover the bottom bracket shell and headset with plastic wrap taped in place. It works in a pinch but leaves adhesive residue and is easy to forget. The marine grease method is cleaner and faster once you build the habit.
For thru-axle bikes, removing the wheels before washing gives you access to the dropouts and lets you dry the axle and bearing areas directly. It also prevents water from pooling where the axle enters the frame. I remove the wheels on my road and gravel bikes for every wash.
Never spray lubricant directly at a bearing to “protect” it. WD-40, chain lube, and tri-flow are solvents that strip grease out of bearings rather than adding protection. If a forum post tells you to hose your headset with WD-40 before a wash, ignore it. That advice leads to noisy headsets and expensive rebuilds.
Drying and Lubricating Your Bike After a Wash
Drying is where most riders drop the ball. They finish the rinse, lean the bike against a wall, and walk away. Six hours later, water is still sitting in the bottom bracket shell, and rust has already started forming on the bearing races.
My drying routine takes about five minutes and makes a measurable difference in bearing life. I start with a large microfiber towel and wipe the whole frame down immediately after the rinse. Then I use a smaller towel to get into the seat tube, around the bottle cage bolts, and inside the front derailleur mount.
Compressed air is helpful here, but only at low pressure. Hold the nozzle a few inches from each bearing location and give a short burst. You’re trying to push surface water off, not inject air into the bearing cavity. A few seconds per spot is plenty.
For the chain, lube selection matters more than most riders think. Wet lube lasts longer in rainy and muddy conditions. Dry lube stays cleaner in dry climates. Apply lube to a clean, dry chain. One drop per roller is the standard rule. Backpedal the chain through a rag to remove the excess from the outside surfaces.
Warning Signs Your Bearings Have Been Damaged
Bearings usually fail gradually. Catching damage early saves you money and keeps a small problem from becoming a stranded-on-the-trail situation. Here are the signs I check on my own bikes every few months.
- Grinding or roughness when spinning the wheel with the bike off the ground
- Notchy or detented feel when turning the bars with no load on the fork
- Play or clicking in the headset when you pull the front brake and rock the bike forward and back
- Creaking from the bottom bracket area when pedaling hard out of the saddle
- Visible rust on the axle ends or bearing covers
- Excess moisture or dark grease leaking from a bearing seal
If you catch one of these signs early, you can often service the bearing by cleaning and repacking it before the races pit. Ignore the warning, and you end up replacing the entire hub or bottom bracket. The cost difference is usually 5x to 10x.
Frequently Asked Questions
How do I wash bike bearings without damaging them?
Avoid spraying water directly at any bearing seal. Use the bucket method with mild soapy water and a soft brush. Rinse with a garden hose on the rain setting, dry the bike immediately with microfiber towels, and relube the chain. For extra protection, pack the exposed seal edges with marine grease before washing.
How do I clean a bike without damaging it?
Use low-pressure water only, keep spray away from the headset, hubs, and bottom bracket, avoid harsh degreasers on the frame, dry the bike immediately after rinsing, and apply fresh chain lube once everything is dry. Skip pressure washers and car washes entirely.
Is WD-40 good for cleaning bikes?
WD-40 is a solvent, not a lubricant. Spraying it on a bike strips grease from bearings and washes away chain lube. Use WD-40 only for specific tasks like removing stubborn adhesives or flushing a dirty chain before relubing. For general cleaning, use a mild bike wash and water.
Can I use 70% isopropyl alcohol to clean bearings?
Yes, 70% isopropyl alcohol works for cleaning bearing internals when the bearing is fully removed and disassembled. The 70/30 mix of alcohol and water cuts through old grease and evaporates quickly. Do not spray alcohol at sealed bearings still installed in the bike, as it can degrade the rubber seals and strip the grease inside.
How often should I wash my bike?
In dry, clean conditions, once a month is plenty for the drivetrain and frame. In wet or muddy conditions, wash the drivetrain after every ride and the frame as needed. A quick rinse of the chain and cassette after a muddy ride prevents grit from grinding into the drivetrain and extends component life.
Final Thoughts on Washing a Bike Without Ruining the Bearings
Learning how to wash a bike without ruining the bearings comes down to three habits: use the least water that gets the job done, keep that water away from sealed bearing systems, and dry and lube the bike before you walk away. The bucket method with mild soap, a low-pressure rinse, and a microfiber towel does 95% of the work. Pressure washers, harsh degreasers, and skipped drying do most of the damage.
Pick up a small tin of marine grease, set aside 30 minutes a month, and your hubs, headset, and bottom bracket will outlast the rest of the drivetrain. That’s the kind of boring, predictable maintenance that lets you spend your ride time on the trail instead of in the shop.